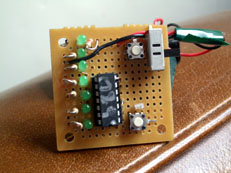
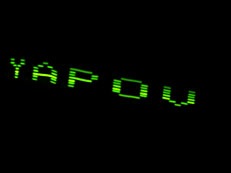
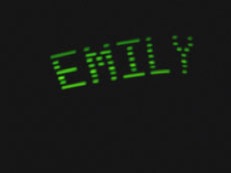
Finally, a project that's even remotely related to what I do in real life. This is a very simple example of yet another persistence of vision device (YAPOV). Seven LEDs and a PIC 16F684 spell out letters when the board is in motion. Getting a good image takes some practice with these things. I couldn't come up with a reliable sensor to detect the limits of each swing (an accelerometer is a little overkill but I have since found this.) Instead, I added a piezo buzzer for a metronome-like guide to timing. Your choice of several messages saved to EEPROM is selectable at startup, and the display is reversed on each backswing in sync with the buzzer so that images remains properly oriented throughout.
Why spend days splattering yourself with hot solder when you can buy a far more sophisticated version, already assembled, for 30 bucks? Well, if you gotta ask... If you'd like get started with POV devices but don't want to design and build from scratch, an excellent place to start is these handheld or bicycle mounted kits. These inexpensive kits are well designed, simple to build, and enjoy a tremendous amount of support from the developer and community in these forums.
FANPOV


It quickly gets tiring waving these things around. Inspired by various bike POV projects (also here), I mounted one on a small house fan. A magnet and reed switch signals triggers the display on each rotation, allowing images to remain in a stable position. All sorts of animations are then possible with this simple synchronization. Letters are reversed and inverted on the bottom half of the fan to keep the lower message appearing upright. Only seven of the LED segments are used in order to utilize the same 7x5 character bit maps in YAPOV. Rotational speed can be calculated, creating a useless but entertaining fan with built-in tachometer, as well as the ubiquitous clock with the addition of a RTC chip to the PIC. A TV remote control triggers a photodiode on the board, cycling through messages while the fan is running. One bit of advice for those who would build this: make sure components are securely fastened to the fan blade. And keep your head down.